Overview
Doofinder Site Search for Magento 1.x allows you to easily publish your products to feed Doofinder with data, and to integrate Doofinder with Magento’s default internal search. Also, you will be able to integrate our search layer with no effort.
Support
- If you have any issue with the module you can contact us from your Doofinder Admin Panel or via our Website.
- If you’re a developer you can file an issue or contribution in our public code repository on Github.
Notice: Doofinder offers this module just to help customers to integrate easily. We are not responsible for any issue or unexpected behavior. We also encourage you to contribute and improve the module in our open code repository.
Prerequisites
Doofinder Account
To use the Doofinder module you will need an active Doofinder account. Doofinder is a paid service but we have a freemium plan for small stores. If you don’t have an account you can sign up here. See plans and pricing here.
Cron
The data feed can be generated on-demand via a front controller URL, or via cron so Doofinder downloads a completely generated file and you save server resources. To generate the data feed via cron you need cron being properly configured.
If you are already using scheduled tasks in your store you can skip this section. Just make sure you know the interval you are using to execute the Cron script because you need that value to configure the module.
Magento comes with two cron scripts: cron.php and cron.sh. The latter will only work in UNIX-compatible systems.
As stated in the Magento documentation site, the recommended frequency values to execute the Cron script are:
- Magento Enterprise Edition: 1 minute
- Magento Community Edition: 5 minutes
Microsoft Windows
In Windows you have to create a scheduled task that will execute the cron.php file that comes at the root path of your Magento installation.
The task should run the following command every 1 or 5 minutes depending on your Magento version:
C:\path\to\your\magento\cron.phpRemember to adapt the path to the file to match your system.
UNIX
You can use the crontab service command if you have shell access to your server. Alternatively add it through your cPanel or similar hosting dashboard.
Run the script every 1 or 5 minutes depending on your Magento version.
Your crontab should look like this (assuming you use Magento Community Edition):
*/5 * * * * /bin/sh /path/to/your/magento/cron.shNotice that we are pointing to cron.sh and not to cron.php. That shell script has some internals to check processes and that kind of stuff.
Remember to adapt the path to the file to match your system.
cPanel
Visit your cPanel, log in and choose Cron Jobs under the Advanced tab.
Configure the task to be run every 1 or 5 minutes depending on your Magento version.
Add a new Cron job for this command (assuming you are using Magento CE):
*/5 * * * * /bin/sh /path/to/your/magento/cron.shNotice that we are pointing to cron.sh and not to cron.php. That shell script has some internals to check processes and that kind of stuff.
Remember to adapt the path to the file to match your system.
Click Add New Cron Job to save changes.
Versions
- The module supports Magento since 1.6 up to 1.9.x.
- PHP 7 is not supported.
Installation
The typical installation process consists of these steps:
- First, go to your store admin panel and log in as an Administrator.
- If applicable, disable caching (System > Cache Management) and disable compilation (System > Tools > Compilation)
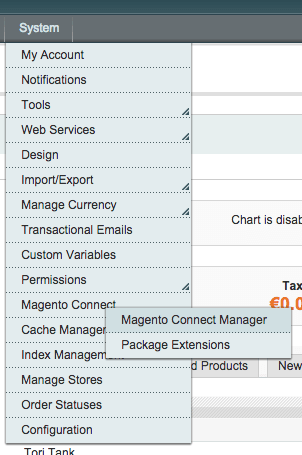
- Install the extension via Magento Connect Manager (System > Magento Connect > Magento Connect Manager). You will have to authenticate again. You can use an installation key or a package file downloaded from the Magento Marketplace (you can also download it from our public code repository on Github). Never install a package via FTP or you will probably lose track of the installed files or may forget to copy some files.
- Flush permissions by logging out of the admin panel and back in.
- Enable the cache, turn compilation on, and recompile if you were previously using those features.
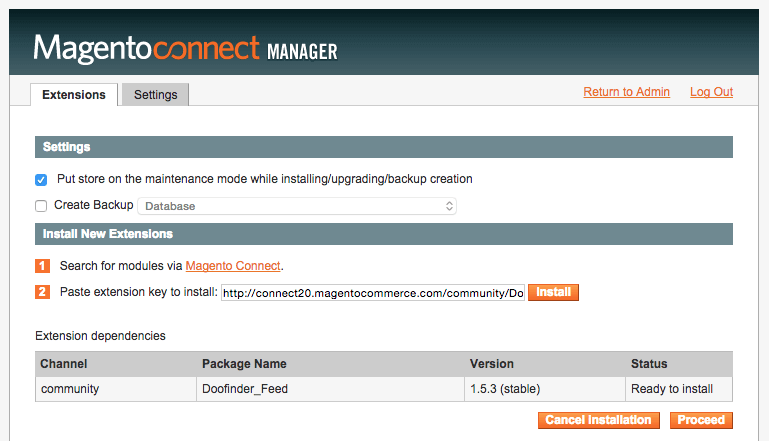
Install with an Extension Key
If you have an extension key from Magento Connect, paste it in the text box located under the Install New Extensions panel. Click Install.
The extension key usually is:
http://connect20.macmagentocommerce.com/community/Doofinder_FeedBut you can get it from the official Magento page:
https://marketplace.magento.com/doofinder-doofinder-feed.htmlIf you typed the extension key correctly a small table with information about the module will be displayed. Click Proceed to actually install the module.
Check the information console to see whether the module has been installed correcly. The new module should appear on the modules list as Doofinder_Feed. If that’s not the case, try to fix the errors by using the information available in the console.
Install from a ZIP package file
If you’ve obtained the installation package directly as a compressed file, use the Direct package file upload panel to select the ZIP file provided from your filesystem.
You can download Doofinder releases directly from this page.
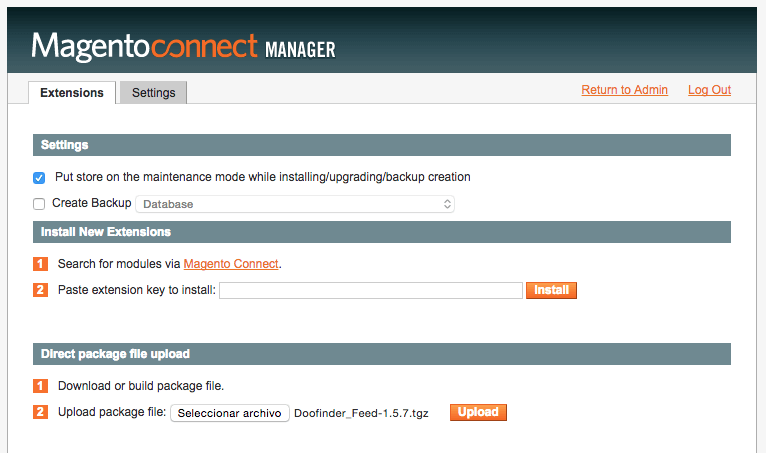
Click Upload and check the information console to see whether the module has been installed correcly. The new module should appear on the modules list as Doofinder_Feed. If that’s not the case, try to fix the errors by using the information available in the console.
Configuration
Most of the options of the module can be set globally or locally for a particular store view. All options are set as global by default and they define the way the module works for each store view.
Other options, like the layer snippet or the search engine identification (hashid) must be configured per store view.
To change the options scope and set different parameters for a particular store view you will have to select the desired scope from the top left menu in the configuration page. Then you will have to uncheck the Use Default option for the setting you want to override. This way the option will refer to a particular store only.
To access the module configuration:
- Go to your store’s admin panel and log in as an Administrator.
- Go to the Configuration section through the System menu.
- Look for the Doofinder Search section in the menu located at the left of the page.
You will see two configuration menus: Product Data Feed and Search Configuration.
Notice: The first time you install the module you can receive a HTTP 404 error message (Page Not Found) at this stage. If this is the case, clean the Magento cache from System > Cache Management. Then log out and log in again.
Data Feed Configuration
Both on-demand and cron-based feeds share settings (except schedule settings). Both types of feed have different enpoint URLs. You can see them in detail at the bottom of the configuration page.
Feed Attributes
By default Doofinder comes with a minimal set of attributes to be exported in the data feed.
You can add additional attributes by clicking the Add button and choosing a meaningful label, an attribute name to be exported in the XML file, and the actual attribute from your Magento database.
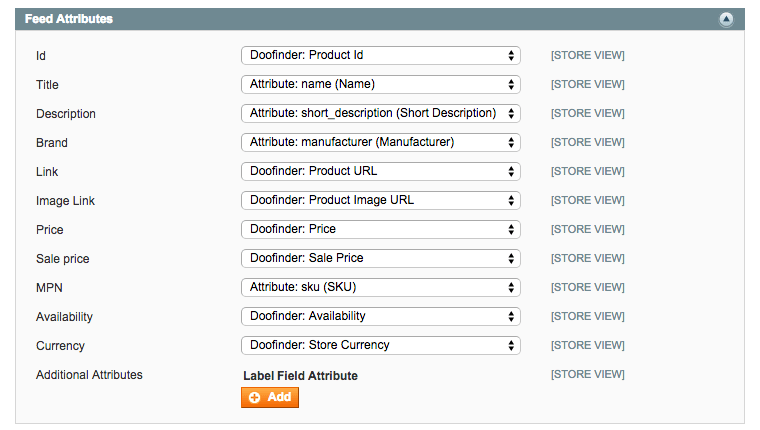
Doofinder applies some optimizations to certain attributes, like prices. That’s the reason why there’re some custom attributes like Doofinder: Price or Doofinder: Availability. If you change them by the raw standard attributes those optimizations won’t be applied.
IMPORTANT: If you want to replace the default Magento’s server search, don’t replace the ID field by a custom attribute. Internal ID is needed for replacing server search by Doofinder.
Feed Settings
These are options that modify the data that is included in the feed.
- Security Phrase: Changes the endpoint URL by adding a secret word so you don’t use the standard URL. This is better to be used once you have the module up and running because, as expected, our semi-automatic installer can’t guess what you’re using as password.
- Use Doofinder API to update products on save: Requires a management API key. See the Troubleshooting section for more info.
- Export Product Prices: Just enable or disable export of product prices.
- Split Configurable Products: Export each component of a configurable product as a separate product.
- Price Export Mode:
- Auto: use catalog display setting
- With tax: export prices with tax
- Without tax: export prices without tax
- Image Size: If you selected a big image for product image you can set an image width here and it will be resized proportionally. Be careful, Magento uses GD library and will try to generate images for the specified size. This operation can consume a great amount of resources.
- Export only categories present in navigation menus: The module only exports active categories. You can enable this option to only export categories used for navigation.
- Debug: Debug mode with intensively verbose logging. Use with care.
Schedule Settings
The module can use cron jobs to generate the data feed in the background by adding your products to a data file located at media/doofinder starting at the root of your site. This way Doofinder can read a fully generated file, so your server will not be in trouble.
You will have one data feed for each of the store views defined in your Magento. You can enable or disable the feed generation globally or per store view.
The URL of your data feeds will look like this by default:
http://www.yoursite.com/media/doofinder/doofinder-{store}.xmlIf the feed is password-protected, the URL will look like:
http://www.yoursite.com/media/doofinder/doofinder-{store}-{password}.xmlTo save the system resources, the feed generation process is divided into stages (iterations).
The process is activated as per the Start Time setting. Each time, in each step, it processes the number of products defined in the Step Size setting, and if there are any unprocessed products, another iteration is registered with the delay defined in the Step Delay setting.
When the whole process is completed, a new feed is saved on the drive, the process goes into standby mode and the start time of a new process is registered as per the Frequency setting.
The settings are:
- Enabled: Activate or deactivate the data feed generation.
- Start Time: The time when the generation process should start.
- Frequency: The frequency with which the data feed is generated. A value of Monthly means that the feed will be updated on the first day of each month starting at the time specified by the Start Time setting.
- Step Size: The number of products added to the feed on each iteration. More on this below.
- Step Delay: The interval between subsequent processes in minutes. Do you remember that we had said that the Cron value was important? The Step Delay can’t be lower than that value. In Magento CE
5;is the minimum recommended value.
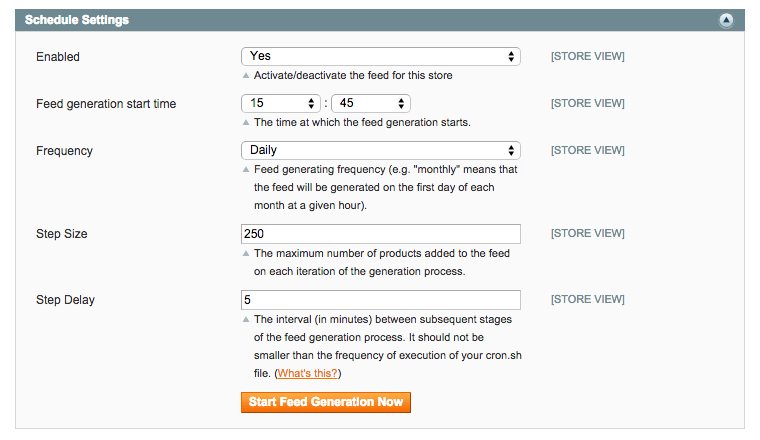
Setting the Step Size
There’s no recommended value for the Step Size setting as it depends on your system resources. Use try and error to find the maximum value that works for you. You can start with the default value of 250 items at each stage and see how it performs.
Take into account that if you have a lot of products and use a very low value for Step Size and a value of Daily for the Frequency your feed could take more than one day to generate so take your time and configure the module properly.
On-demand generation
When you are inside a particular store view scope you will be able to generate the data feed for it on-demand by using the Generate Feed button that you will find at the end of the Schedule Settings panel.
The data feed generation will be scheduled to start just after you press the button so it will start almost immediately.
Feed Status
Different status information is available for the default and the local configuration scopes.
Default Scope
The Feed Status panel provides useful information related to the feed generation process and configuration for each store view:
- Dynamic Feed URL: Provides the URL for on-demand feed generation.
- Atomic Updates: Tells you whether the feature is enabled or not.
- Last Generated Feeds: Links for the last generated feeds and details about scheduling.
Local Scope
- Status:
- Disabled: The feed generation is disabled.
- Waiting: The feed generation is enabled and the next process is waiting to be scheduled.
- Pending: The next feed generation process has been scheduled and is waiting to be executed.
- Error: There was an error.
- Message: Displays relevant information regarding the current status.
- Complete: Percentage of the feed that has been generated in the current process.
- Next Run: The date when the next feed generation process will start.
- Next Iteration: When the feed generation process is in progress, this is the date when the next iteration will take place.
- Last Generated Feed: Link to the last generated feed (if any).
Locks
Locks are temporary files that prevent other processes from writing the current feed file being generated.
If something goes wrong in cron-based feed generation, locks can prevent further processes from generating the feed.
You can remove locks from this panel, but use this feature with care, and only if cron seems not to be working.
Search Configuration
Under this section you can enable and configure the Doofinder Layer script and the Internal Search Feature
Doofinder Layer
- Enabled: Enable the layer. You can enable the layer globally or per store view. If you enable the Doofinder Layer then the Magento’s autocomplete will be disabled.
- Script: The script code to display the layer. This option can’t be set in the global scope and is available only inside the store view scope. You need a different script for each store view. You can get your script from your Doofinder Control Panel.
Internal Search
- Enabled: Use Doofinder for search instead of the default mechanisms. You can enable the internal search globally or per store view.
- API Key: Required. You need a secret API key to authenticate search requests from your server. You can get your API Key from your Account page in the Doofinder Control Panel. Learn More. If you choose to update products on save you’ll need a management API key, which allows to change products being indexed via API.
- hashid: This is the unique ID of your search engine. This option can’t be set in the global scope and is available only inside the store view scope. You need a different hashid for each store view.
Troubleshooting
Server search doesn’t work
In this case, check that you’ve configured an API key in the module’s Internal Search settings panel. Learn More about API keys.
I get an error while saving products in the catalog
Probably you’ve enabled the atomic updates feature and there’s no API key configured or a search-only API key instead of a management API key is being used. To update items in Doofinder via API you need an API key with more privileges than for regular search.
Doofinder can’t detect the module
- If Doofinder says: Your server returned a 401 HTTP response (authorization required) it means that your server is asking for a user and a password via HTTP authentication. Disable authentication for the
*/doofinder/*;path (e.g.: http://www.example.com/doofinder/*). - If Doofinder says: Your server returned a 403 HTTP response (access forbidden) it means that your server is preventing Doofinder from accessing the
*/doofinder/*;path (e.g.: http://www.example.com/doofinder/*). You can grant access to these IPs (54.171.4.216, 54.174.3.111) or grant access to anyone. - In any other case:
- Check that you’ve installed the module. Go to
System > Magento Connect > Magento Connect Manager;and check if the module is listed in the installed modules list. - Refresh the configuration cache of your Magento, and …
- … Log out from the admin of your Magento store and log in again.
- If you’re getting HTTP 50x errors related to the non-existence of some classes of the module, continue reading the next question.
I’m receiving HTTP 50x errors / blank screens when trying to access the module
If you’re using Magento’s compiled mode probably the module classes have not been compiled.
The compilation process involves copying files to not so deeper paths in your filesystem by renaming them.
For example, this file:
./app/code/community/Doofinder/Feed/Model/Tools.phpwould be copied to a single folder like this (can be different in your system):
./src/Doofinder_Feed_Model_Tools.phpBut, if Magento has not been recompiled, your Doofinder configuration panel and feed generation will break due to Magento not finding the module files in the compilation paths.
To recompile Magento go to System > Tools > Compiler.
Ensure that you understand what’s compilation mode first!
Use this at your own risk!
The configuration section in my Magento admin is returning a Page Not Found error
Refresh Magento’s cache, log out from the admin panel then log in and try again.
Cron is not working: expr: syntax error
Update your cron.sh ;file to something more compatible. Change this line:
if [ "$INSTALLDIR" != "" -a "`expr index $CRONSCRIPT /`" != "1" ];thenby this one:
if [ "$INSTALLDIR" != "" -a "`echo $CRONSCRIPT | sed -n 's/[/].*//p' | wc -c`" != "1" ]; thenCustom attributes not being included in the data feed after enabling Flat Catalog feature
When enabling the flat catalog, Magento indexes products and categories and, instead of sending queries to multiple tables, it sends queries only to one which is called flat. Theoretically, it doesn’t change anything apart from performance.
When the flat catalog is enabled, Doofinder stops working, which is normal. The catalog then has to be indexed. Everything should work the same way when the indexes are updated.
The following options have to be selected per attribute configuration for custom attributes to work:
- Visible on Product View Page on Front-end: Yes
- Used in Product Listing: Yes
That should help.
Other errors
If you need more help feel free to contact us at support@doofinder.com.
Uninstall
Access the Magento Connect Manager through System > Magento Connect > Magento Connect Manager. You will have to authenticate again.
Find Doofinder_Feed in the modules list and choose Uninstall from the dropdown on the right.
Click Commit Changes.
Check the information console to see whether the module has been uninstalled successfully. If the console does not display any errors and the module disappears from the modules list after clicking the Refresh button then everything went right.