Calculate and display the percentage discount
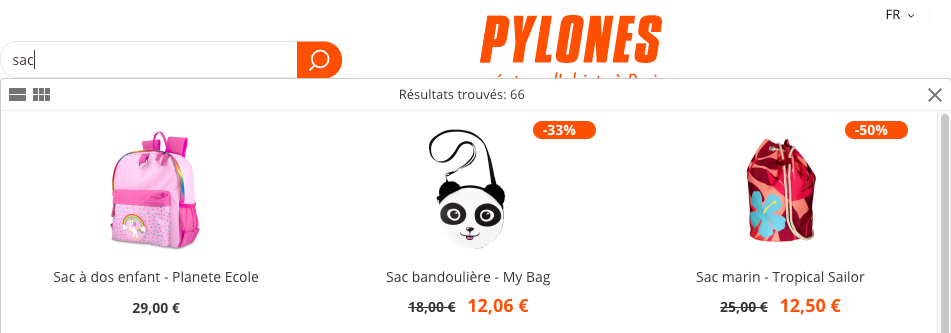
Once in a while, you may offer your products at discounted prices and may want these products to be more visible to the customers. Using Doofinder, you can calculate the percentage discount and have it displayed in the Doofinder layer such that your users can directly see the best offers while using the search!

To achieve this customisation, you will need:
- a price and sale_price field in your feed
- a custom results template
- a callback
- some nice CSS rules
Indexing the price
Firstly, you need to have indexed a price and a sale_price field in your feed. Remember that the price field corresponds to the normal price, and the sale_price field should contain the discounted price.
📌 Note: You need to index a “sale_price” only if there is a discounted price; otherwise, leave it empty.
Customs results template
Secondly, copy and paste the following template to display the percentage discount within the Doofinder layer:
<script type="text/x-mustache-template" id="df-results-template">
{{#is_first}}
  {{#banner}}
    <div class="df-banner">
      <a {{#blank}}target="_blank" rel="noopener noreferer"{{/blank}} href="{{link}}" data-role="banner" data-banner="{{id}}">
        {{#image}}
        <img src="{{#remove-protocol}}{{image}}{{/remove-protocol}}">
        {{/image}}
        {{#html_code}}
        {{{html_code}}}
        {{/html_code}}
      </a>
    </div>
  {{/banner}}
{{/is_first}}
{{#total}}
  {{#results}}
    <div class="df-card" data-role="result">
      <a class="df-card__main" href="{{#url-params}}{{{link}}}{{/url-params}}" data-role="result-link" data-dfid="{{dfid}}">
        {{#discount}}
        <div class="df-discount">-{{discount}}%</div>
        {{/discount}}
        {{#image_link}}
          <figure class="df-card__image">
            <img src="{{#remove-protocol}}{{image_link}}{{/remove-protocol}}" alt="{{title}}">
          </figure>
        {{/image_link}}
        <div class="df-card__content">
          <div class="df-card__title">{{title}}</div>
          <div class="df-card__description">{{{description}}}</div>
          {{#price}}
          <div class="df-card__pricing">
            <span class="df-card__price {{#sale_price}}df-card__price--old{{/sale_price}}">
              {{#format-currency}}{{price}}{{/format-currency}}
            </span>
            {{#sale_price}}
              <span class="df-card__price df-card__price--new">
                {{#format-currency}}{{sale_price}}{{/format-currency}}
              </span>
            {{/sale_price}}
          </div>
          {{/price}}
          {{#df_rating}}
          <div>
            <div class="df-rating" title="{{df_rating}}">
              <div class="df-rating__value" style="width: {{#rating-percent}}{{df_rating}}{{/rating-percent}}">
                <i>★</i><i>★</i><i>★</i><i>★</i><i>★</i>
              </div>
              <div class="df-rating__placeholder">
                <i>★</i><i>★</i><i>★</i><i>★</i><i>★</i>
              </div>
            </div>
          </div>
          {{/df_rating}}
        </div>
      </a>
    </div>
  {{/results}}
{{/total}}
{{^total}}
  {{#noResultsHTML}}{{{noResultsHTML}}}{{/noResultsHTML}}
  {{^noResultsHTML}}
    <p class="df-no-results">{{#translate}}Sorry, no results found.{{/translate}}</p>
  {{/noResultsHTML}}
{{/total}}
</script>
As you can see, this new field is displayed next to the product image. Don’t worry if you do not have this field in your feed yet, as we will create it in the following step.
Remember also that you need to invoke the template in your Doofinder script:
<script type="text/javascript">
var doofinder_script ='//cdn.doofinder.com/media/js/doofinder-classic.7.latest.min.js';
(function(d,t){var f=d.createElement(t),s=d.getElementsByTagName(t)[0];f.async=1;
f.src=('https:'==location.protocol?'https:':'http:')+doofinder_script;
f.setAttribute('charset','utf-8');
s.parentNode.insertBefore(f,s)}(document,'script'));

var dfClassicLayers = [{
  "queryInput": "#xxxxxxx",
  "hashid": "xxxxxxxxxxxxxxxxxx",
  "zone": "eu1",
  "display": {
    "lang": "xx",
    "width": "xx%",
    "results": {
      "template": document.getElementById('df-results-template').innerHTML
    }
  }
}];
</script>
Generating a callback
As earlier mentioned, you will need to generate the discount percentage using the callbacks. To do this, you can insert the callback into your script as follows:
<script type="text/javascript">
var doofinder_script ='//cdn.doofinder.com/media/js/doofinder-classic.7.latest.min.js';
(function(d,t){var f=d.createElement(t),s=d.getElementsByTagName(t)[0];f.async=1;
f.src=('https:'==location.protocol?'https:':'http:')+doofinder_script;
f.setAttribute('charset','utf-8');
s.parentNode.insertBefore(f,s)}(document,'script'));

var dfClassicLayers = [{
  "queryInput": "#xxxxxxx",
  "hashid": "xxxxxxxxxxxxxxxxxx",
  "zone": "eu1",
  "callbacks": {
    "loaded": function(instance) {
        var controller = instance.layer.controller;
        controller.processors.push(function(response) {
            response.results = response.results.map(function(result) {
                if (result.price != result.best_price) {
                    var price = result.price,
                        best_price = result.best_price;
                    result.discount = Math.ceil((price - best_price) * 100 / price);
                }
                return result;
            });
            return response;
        });
    }
  },
  "display": {
    "lang": "xx",
    "width": "xx%",
            "results": {
      "template": document.getElementById('df-results-template').innerHTML
    }
  }
}];
</script>
Customising the CSS
Now you will see the percentage discount appear within the Doofinder layer. You can customise it further using some CSS code as follows:
<style type="text/css">

.df-discount {
  position: absolute;
  text-align: center;
  background-color: #FF5000;
  padding-right: 20px;
  padding-left: 10px;
  color: white;
  font-size: 14px;
  border-radius: 21px;
  font-weight: 900;
}

</style>
Since we are using the CSS position: absolute, you need to modify the df-card__main CSS to set it as relative:
.df-card__main{
    position: relative;
}
Should you encounter any problems, please contact support@doofinder.com.
Last Updated: June 2021